Friday, June 8, 2012

Tuxedo Nails!


Tomorrow is a big day...my friend Nicole is marrying her fiance Greg! Nicole and I have known each other since we were in middle school. We spent many, many Friday nights together throughout junior high and high school, hanging out at the mall and movie theater, waiting for our parents to come pick us up! Many Friday nights at high school football games and TGI Friday's afterwards, and once I even lied to administrators at my high school, saying Nicole was my cousin, just so she could go to the Make-A-Wish Foundation Dance Fundraiser with me! (We did get kicked out which was complete bull$hit, especially since I raised the most money that year. I ended up winning free prom tickets!)

I'm not in Nicole's wedding, but that doesn't mean I can't get all dressed up and go all out. And by all dressed up I mean my nails. There are three things I think a lady must always check off before she leaves the house. 1) wear decent undies. You never know when you'll be in a car accident and have to have your pants cut off in the emergency room. Seriously. I worry about this happening. 2) always have clean hair. Along with no holes in your underwear, who knows when you'll be able to shower again. Dry shampoo will only take you so far. And 3) do your best to have nice nails. I don't care if they're acrylic, gel or natural, just keep them from looking like talons and slap a coat of neutral paint on them so you look like a woman. 

I knew right away back January how I would be wearing my nails to at least one of the four (4!!) weddings I will be attending this year. Zoey Deschanel wore tuxedo nails on the red carpet for the Golden Globe awards. They were fabulous! You can see what inspired my look here. Love them!

This mani was fairly simple to create. I don't have any black nail polish and the dress I'm wearing is blue so I decided a dark midnight blue would work perfectly. (BTW- the dress looks purple online and is even called Purple Royale...but it is seriously the same color as my old Civic SI- if I put the dress on top of the hood you wouldn't be able to see where they aren't the same. Exact dupe) For this mani you will need: nail polish remover, cotton balls, q-tips, toothpicks and at least two colors of polish. I used Sally Hansen's White Tip for the white, China Glaze's Up All Night, and OPI's Last Friday Night from their Katy Perry Collection.


I painted both of my ring fingers with two coats of White Tip and let it dry. 
 
Then I painted the bottom of my nail with Up All Night. I just went slow and started with a thin line and made it thicker as I went. 

Then I placed one dot directly above the line in the middle of my nail, and surrounded it with two dots on each side. From there it was a simple task of connecting the dots to create the bow. Finally, I added three dots down from the bow to the line looking like buttons. 
I painted the rest of my nails with two coats of Up All Night and let them dry. I finally went back over the tuxedo with Last Friday Night. It's a blue glitter and it really made them pop! I topped everything off with one coat of Essie's Polish Refresher. 

When I think of tuxedos, this comes to mind!! I absolutely love this part of the movie and it's so true. Tuxedos are formal but tuxedo nails are fun! So what do you think? Are tuxedo nails something you see yourself wearing to an event? I think these nails are awesome and will be great for tomorrow's wedding! Congrats to Nicole and Greg!
 

Wednesday, June 6, 2012

Splatter Nails


I haven't done one of these posts yet! I'm surprised because I am obsessed with all things nails! I love nail polish :o) The job I had before I got laid off really kicked off my passion for painting nails. I nannied a little girl who loved having her toenails painted. (Check back later- I'm going to post all of the toe nail designs I have painted! Fun!) Of course I needed to buy colors to do all the designs I wanted and I decided I was only going top shelf and therefore... An OPI addict was born!

You can see some yellow around my middle finger and splashes on my hand from my attempt at a whole hand of splattered nails!
I decided to create a splatter affect on my nails. This look is achieved by dipping a straw into the color of polish you want to splatter and holding it about 4 inches from your nails. Then take a deep breath and blow hard through the straw. The polish will splatter out onto your nails. I wanted to do all my nails but all I ended up with was a huge splattered mess on my hands. So I cleaned it all up and taped off around my ring fingers and only applied the splatter affect to them.

You will need a base color polish, 4-5 different colors to splatter, some straws, cotton balls, nail polish remover, tape and cotton swabs.

I began by painting all of my nails with one coat of China Glaze Snow. Then I painted my nails with two coats of Ultra Pro's Punki Pink. This is a fantastic hot pink and the more coats you add the brighter it gets. I let this dry and then prepared for the splattering. You can use any colors you want in any order. For my splatter effect I used OPI's Ate Berries in the Canaries, OPI's Rumples Wiggin', Sally Hansen's Lightning and China Glaze's Snow. It takes awhile to dry and when I had too big of a glob of one color, I used some crumpled up Saran Wrap to shift it around. It is supposed to look crazy! Once my nails were completely dry I added a coat of Essie's Polish Refresher. I know, I know, it's not a top coat, but I'm completely out of my favorite top coat CND's Super Shiney. Best. Top Coat. Ever. Use your nail polish remover and cotton swabs to clean up any mess you have and ta-da! Splattered nails :o) I'm going to try this one out again for the Fourth of July with red, white and blue. Hope you enjoyed this nail post!


Tuesday, June 5, 2012

Hair Today, Gone Tomorrow


If you know me, then you know I love long hair. I have always had long hair...it's just part of who I am. If you ask me to name a beautiful woman I would say: Angelina Jolie. Beyonce. Eva Longoria. Ali Landry. They ALL have long hair. I had really long hair at our wedding and then got it cut soon after. I've been letting it grow since, so it is pretty long. It also had some really bad split ends. I knew I would definitely be getting at least an inch cut off the length so I began looking at hair cuts in general. I have loved this hair style on Gwyneth Paltrow for a really long time.
I think this hair cut is gorgeous. I love the length and the color but this hair cut IS the style. There would be no ponytails or half pulled back and I cannot stand hair hanging in my face.I posted this picture on my facebook and the opinions on whether I should do it were really 50/50. Then I posted a picture of myself with my long hair. 
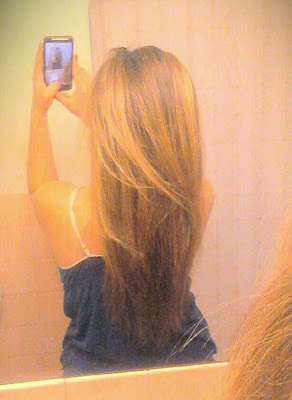
I had a lot of people saying to go for it, and a lot of friends saying to keep it long! I planned on having it cut up to about the top of my tank top. I thought all night about whether to cut it or keep it long and when I woke up I knew deep down that I could never have a cut like Gwyn's. It's absolutely beautiful, but she's a celebrity and I'm just me and I do wear pony tails more often than not. I needed it longer so I could style it. This is a picture of me right before I got dressed for my appointment!
Very long!!! I loved it!

Let me just say how much I love my hair stylist. Her name is Erin and I've been going to her for almost 6 years. Our relationship began around the same time as I started dating my husband! So I would say it's serious :o) She has never screwed me over in any way and always gives her honest opinion on my hair. She knows I loathe bangs, side bangs, short sides, razored edges, etc. and knows I love long hair, long layers, blonde highlights and being a red head occasionally! She rocks. When I got there today I showed her the 3'' I definitely wanted chopped off before we began anything. She snipped them and we started talking coloring. Ryan has wanted me to go blonde for the longest time so we decided we would do that (well, as blonde as a brunette can be without looking like a hooker). Erin foiled my entire head (it took an hour) and then I had to sit under the steamer and sweat for 15 minutes. Rinse, wash, condition, rinse again and we were ready to get out the shears. I told Erin to cut it up to my shoulder blades. She gave me a mirror to look at it. I looked in silence contemplating for honestly a good 30 seconds before I said, "take off another inch and a half." Erin chopped that off and then I closed my eyes until it dried and styled!

I'll admit. I was scared to death to look in the mirror. Erin gave me the mirror again to look at the back and I think she was holding her breath! I finally said, "I love it!!" and that was the truth. It is a huge, huge change for me but I'm glad I did it. My hair feels a lot lighter, bouncier and healthier. Here are a few new pics!

It looks crooked because I'm leaning back on one side!
I love it! What a huge difference and overall I lost about 9 inches. But I'm definitely more blonde and way shorter hair but I absolutely am very happy!!